This post was written jointly with Auda Eltahla, the Microsoft Research Engagement Manager for the Asia region.
The content is based on this excellent blog post by Sam Cogan, which contains further notes on how to use locking to prevent subsequent changes (e.g. reactivation) of shut down resources.
Overview
One concern when using Azure for research purposes is how to ensure the workload runs within an allocated, fixed budget. Azure Cost Management and Billing provides an excellent suite of tools to monitor and manage spending. However, while it provides excellent alerting tools, it does not natively support shutting down resources once a budget threshold is met. In this tutorial we will demonstrate how to overcome this issue by using budget alerts to initiate an automation script that shuts down all VMs in a specific resource group. You can of course change this script to shut down any resource or delete an entire resource group and thus all resources tied to it.
This post provides a way to address concerns related to very strict budget limitations. It is highly recommended that Azure Cost Management and Billing be used as a default for budget monitoring and management since it provides a rich suite of tools and integration with other Azure services.
TL;DR
You can enforce budgets with existing Azure components and some PowerShell code. You will need an Azure Automation Account and associated Runbook that keeps the PowerShell code to shutdown VMs. Authentication happens through a Service Principal. The Runbook will be made part of an Action Group that is triggered once a budget limit is hit.
While writing this post, an article on how to manage Costs with Azure Budgets was published on Microsoft Docs, which works very similar, but uses Logic Apps instead of PowerShell Code.
Prerequisites
- For later steps we will assume that you have an Azure budget already set up. If you don’t already have one, follow the official tutorial to create a budget.
- Please note that budgets are not supported in sponsored or CSP subscriptions.
Step by Step Guide
Creation of a Service Principal
A Service Principal (SP) is an identity that is used by user-created apps and tools to access Azure resources automatically. See this Stackoverflow post for a good explanation. In our case the SP’s credentials will be used by the Runbook script to authenticate with Azure and shut down resources. If you have an existing SP, you can reuse it, otherwise create a new one as described below.
1. Create a new Service Principal by using the Azure CLI, PowerShell or the Azure Portal. The Service Principal is tied to an “application”, which is really just a placeholder. Don’t worry about the details. Follow the steps for your method of choice and remember to note down the “application id” and “password/secret”.
2. Note down your tenant and subscription ids
- Look up the tenant id in the Azure Portal by navigating to
Azure Active Directoryand thenProperties - The subscription id can be find by navigating to
Subscriptionsand then clicking on the subscription of interest.
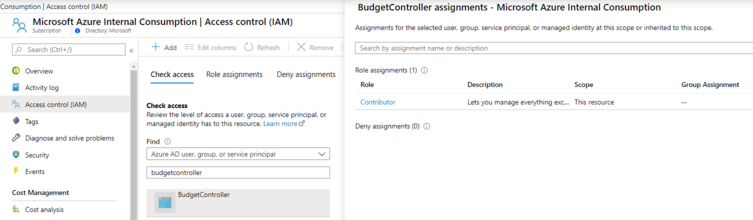
3. Give your created SP Contributor access to your subscription. To achieve this in the Azure Portal, go to Subscriptions and Access Control (IAM). Click on Add a role assignment, select Contributor, search for your SP (“BudgetController” in the screenshot), select it and save.
Azure Automation Setup
Automation Account
As the name implies, Azure Automation is a cloud-based automation and configuration management service. In our case, the automation account will hold the SP credentials and the code (as Runbook) that we want to run, once we hit a budget threshold.
1. In your Azure Portal, search for “Automation Accounts” and add a new account
- Give your Automation account a descriptive Name
- Create a new Resource Group
- Choose a Location closest to you
- Leave everything else with default values and click create
To avoid having to save the SP credentials in your script, we will make use of the Automation Account Credentials.
2. Once the account is created, locate Credentials under the accounts Shared Resources. Click Add a credential and add user name (application id) and password (secret) of your service principal.
3. Give the credential a descriptive name. We will simply use “AzureCredential” here.
Runbook
Now we will create a Runbook which holds the code that we want to trigger. In our case this code will shutdown VMs in a resource group of our choice. The code is based on Sam Cogan’s version, but contains a few changes. In our version, we make use of the newer az module. To make this work, we will first have to install some modules in your Automation account:
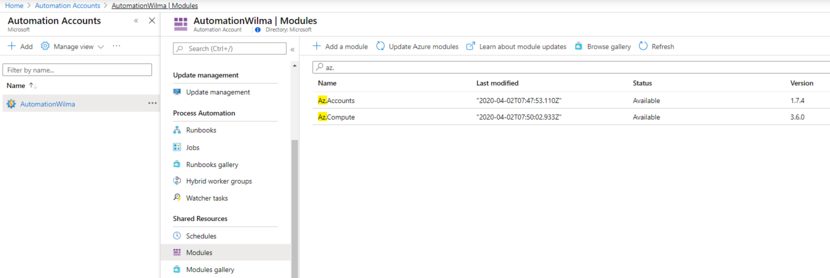
1. Under Modules gallery search for Az.Accounts and click Import to install it under your account. Give it some time to finish installing before proceeding
2. Similarly under the Modules gallery find and import the Az.Compute module.
Both modules should now show up under the Modules tab, as shown in the screenshot.
Now, that these modules are installed, you can add the code:
1. Click on Runbooks and Create a runbook
- Enter a descriptive name (e.g. “ShutdownVMsinRG”)
- Select PowerShell as Runbook type
- Hit create.
2. Open the newly created Runbook, copy and paste this PowerShell code and hit save. EDIT: the code was unfortunately never commited to the repo and was hence lost when I left Microsoft. Your best bet is to start from Sam Cogan’s version.
Test the Runbook
To make sure that everything works as expected, you can try out the Runbook without attaching it to an ActionGroup and budget. Let’s see our Runbook in action:
1. Start at least one small VM in a newly created resource group using the Azure Portal, PowerShell or the Azure CLI.
2. Go back to your Automation account and Select the Runbook you created previously.
3. Under the Overview, click Edit and then Test Pane.
4. On the left you will need to key in four required parameters (see also the first section of the code; EDIT: see comment above):
AZURECREDENTIALASSETNAME: the name of the Automation credentials created aboveAZURESUBSCRIPTIONID: your subscription idAZURETENANTID: your tenant idRESOURCEGROUPNAME: the name of the resource group you want the script to act upon. Double-check your choice!
5. When ready, hit Start. The script waits for each VM to shutdown properly, so if you have multiple VMs running, it will take some time to complete.
Create an Action Group
If everything works as expected, you are now ready to connect the pieces. In particular, you will add the Runbook to an Action Group, which will be triggered once a budget limit is hit.
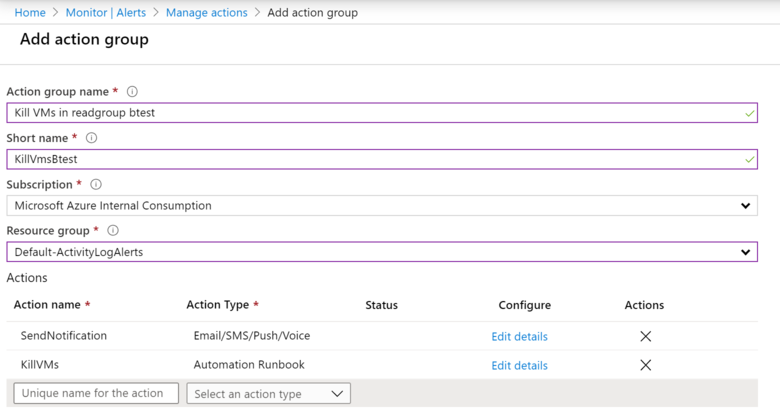
1. In the Azure Portal, search for Alerts and click on Manage Actions and Add Action Group.
2. Give the action group a descriptive name. Keep in mind that the action group will act on a specific resource group. Adding the resource group name as part of the action group name helps avoiding later confusion.
3. It’s optional, but good practice, to also add an Email/SMS/Push/Voice notification under Actions.
4. Add the action which is tied to the Runbook created previously. This is done by adding a name for the action and selecting Automation Runbook as Action Type.
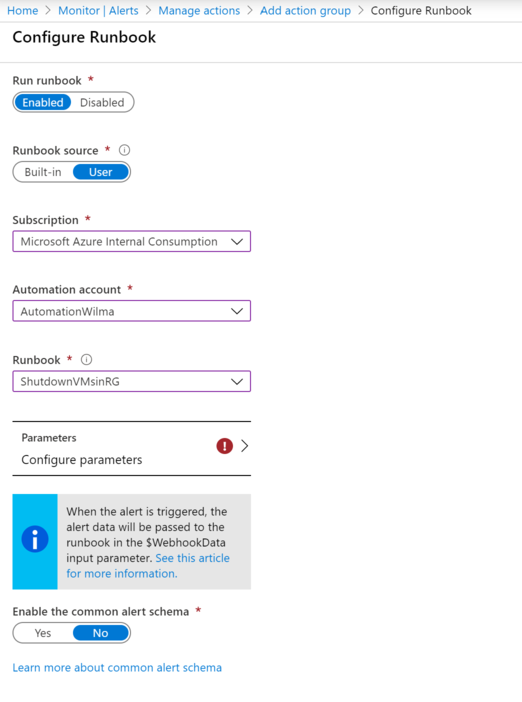
5. In the wizard that pops up:
- Choose
UserasRunbook source - Choose the subscription you are using
- Choose your automation account created for this purpose
- Choose the Runbook created above
- Click on
Configure Parametersand key in the same parameters as used for testing, with the exception of a new resource group that you want this Runbook to act on and that your existing budget already monitors.
Add Action Group to Budget
Now that you have created an ActionGroup, let’s associate it with a budget.
1. In the Azure Portal, go to Cost Management + Billing.
2. Navigate to Cost management and Budgets and open your budget of interest (or see the docs on how to create a new one)
3. Click on Edit budget and go to 2. Set alerts
4. Under Alert conditions, enter a new percentage
5. Select the action group created above and hit Save.
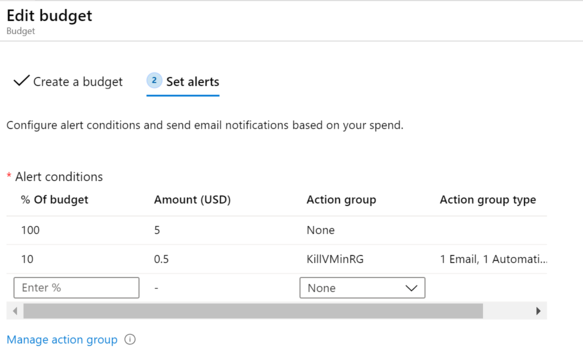
The action group, which contains the PowerShell script that shuts down the VMs, will now be triggered as soon as your budget hits the set threshold.
And that’s it.