Edit (Aug 2020): This has made it into the official Snakemake documentation. Refer to the official AKS executor tutorial
Snakemake and Nextflow are two very popular bioinformatics workflow management systems. They allow to write analytics workflows that seamlessly scale, are reproducible, reentrant and make it easy to move between compute systems. They are by no means restricted to Bioinformatics, but that’s where both originated. In this blog post I will show how to run a workflow on an auto-scaling Azure Kubernetes cluster with on-the-fly software installation and without a shared file-system (e.g. NFS on typical Linux cluster).
While Kubernetes is mainly known as container orchestration system with self-healing properties, we will use it here simply as auto-scaling compute orchestrator. One could use persistent volumes in Kubernetes as shared file system, but this adds an unnecessary level of complexity and most importantly costs. Instead we use cheap Azure Blob storage, which is used by Snakemake to automatically stage data in and out for every job. So even if a job fails or node dies, check-pointing won’t be affected because the data sits on inexpensive blob storage.
Native Azure support is slowly finding its way into the Snakemake code base. Azure Blob storage support was first implemented by Sebastian Kurscheid. The recent addition of the --envvars option by the Snakemake author Johannes Köster and some additions made by myself, made it possible to use Snakemake in the way described here.
Step-by-step guide
Following the steps below you will
- first install (a patched version) of Snakemake,
- create Azure Blob storage setup, download the Snakemake tutorial data and upload to Azure,
- then create an Azure Kubernetes (AKS) cluster
- and finally run the analysis with Snakemake on the cluster
Note: almost all steps are run on the command-line, but they can of course instead be performed in the Azure Portal.
Install Snakemake and friends
In this section we will install a version of Snakemake that supports Azure Blob storage as remote provider. At the time of writing, the corresponding code changes (see pull request) are not merged into the master branch yet, but this should happen soon, i.e. you will get the functionality with the default version of Snakemake.
Get the code and merge the pull request:
cd /tmp
git clone https://github.com/snakemake/snakemake.git
# Note to self: HEAD was 3df86e76
# check out the pull request implementing azure default remote storage
git fetch origin pull/324/head:az-default-remote
git checkout az-default-remote
Install the now patched version of Snakemake to a new Conda environment (this assumes you have Conda installed):
conda create -n snakemaks python=3
conda activate snakemaks
python setup.py install
# extra packages needed later
pip install azure-storage-blob
pip install kubernetes
Create an Azure storage account and upload example data
Assuming you are starting from scratch, you will need a new resource group and storage account. You can obviously reuse an existing account instead.
# create a resource group called `snakemaks-rg` in the South East Asia region
az group create --name snakemaks-rg --location southeastasia
# create a general purpose storage account called `snakemaksstg` with cheapest SKU
az storage account create -n snakemaksstg -g snakemaks-rg --sku Standard_LRS -l southeastasia
Get a key for that account and save it as stgkey for later use:
stgkey=$(az storage account keys list -g snakemaks-rg -n snakemaksstg | head -n1 | cut -f 3)
Upload the Snakemake tutorial data:
# First we create a storage container (think: logical groups or bucket)
# Should you get an unexpected authentication error, make sure your time is set correctly.
az storage container create --resource-group snakemaks-rg --account-name snakemaksstg \
    --account-key $stgkey --name snakemake-tutorial
cd /tmp
git clone https://github.com/snakemake/snakemake-tutorial-data.git
cd snakemake-tutorial-data
az storage blob upload-batch -d snakemake-tutorial --account-name snakemaksstg \
    --account-key $stgkey -s data/ --destination-path data
Side note: I had to learn the hard way, that you shouldn’t put a Snakefile into the main directory of the Snakemake tutorial (or any git repo with lots of data, unless you know what you are doing). Snakemake will upload all repo data your remote compute (it’s a feature).
Create an auto-scaling Kubernetes cluster
az aks create --resource-group snakemaks-rg --name snakemaks-aks \
    --vm-set-type VirtualMachineScaleSets --load-balancer-sku standard --enable-cluster-autoscaler \
    --node-count 1 --min-count 1 --max-count 3 --node-vm-size Standard_D3_v2
There is a lot going on here, so let’s unpack it: this creates an auto-scaling Kubernetes cluster (--enable-cluster-autoscaler) called snakemaks-aks that starts out with one node (--node-count 1) and has a maximum of three nodes (--min-count 1 --max-count 3). For real world applications you might want to increase the maximum count and also increase the VM size. You could for example choose a large instance from the DSv2 series and add a larger disk with (--node-osdisk-size) if needed. See here for more info on Linux VM sizes.
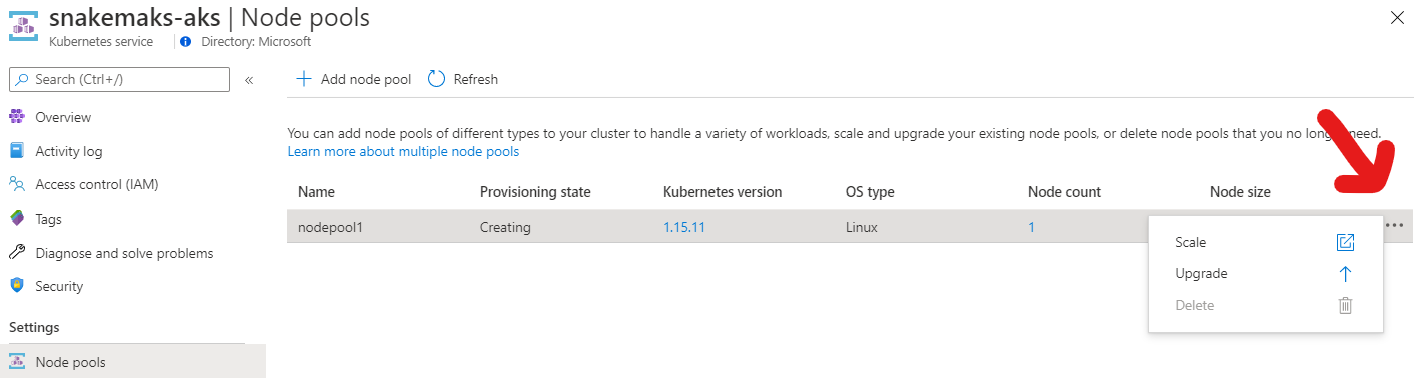
If you are creating the cluster in the Azure portal, click on the ellipsis under node-pools to find the auto-scaling option as shown in the screenshot.
Next, let’s fetch the credentials for this cluster, so that we can actually interact with it. Otherwise you might later get cryptic errors from Snakemake like “socket.gaierror: [Errno -2] Name or service not known”.
az aks get-credentials --resource-group snakemaks-rg --name snakemaks-aks
# print basic cluster info
kubectl cluster-info
Run the workload
Getting the Snakefile
Now we need the actual Snakefile (download here). This Snakefile also defines different conda environments for different tasks, i.e. it installs different programs with specific versions into their own namespace. This is a great way of keeping your software installations tidy and also makes this workflow reproducible. The yaml files describing those environments are part of the package (see download above).
cd /tmp
unzip snakedir.zip
# creates a new directory called snakedir
cd snakedir
The directory contains only the Snakefile and two conda environment yaml files:
$ find .
.
./Snakefile
./envs
./envs/calling.yaml
./envs/mapping.yaml
Calling Snakemake
We will need to make sure that the Kubernetes nodes have permission to read and write from blob storage. For the AzBlob storage provider in Snakemake this is done through the environment variables AZ_BLOB_ACCOUNT_URL and optionally AZ_BLOB_CREDENTIAL.
AZ_BLOB_ACCOUNT_URL takes the form https://<accountname>.blob.core.windows.net and may also contain a shared access signature (SAS), which is a powerful way to define fine grained and even time controlled access to storage. The SAS can be part of the URL, but if it’s missing, then you can set it with AZ_BLOB_CREDENTIAL or alternatively use the storage account key. To keep things simple we’ll use the storage key here, but a SAS is generally more powerful. We’ll pass those variables on to the Kubernetes with --envvars (see below).
Now you are ready to run the analysis:
export AZ_BLOB_ACCOUNT_URL="https://snakemaksstg.blob.core.windows.net"
export AZ_BLOB_CREDENTIAL="$stgkey"
snakemake --kubernetes --container-image andreaswilm/snakemaks:5.17 \
    --default-remote-prefix snakemake-tutorial --default-remote-provider AzBlob \
    --envvars AZ_BLOB_ACCOUNT_URL AZ_BLOB_CREDENTIAL --use-conda --jobs 3
The compute instances (Kubernetes nodes) have to run the same Snakemake version as installed locally and also support Azure Blob storage. I used a Docker image (andreaswilm/snakemaks:5.17), which I published on Dockerhub (see below for details).
While Snakemake is running the workflow, it prints handy debug statements per job, e.g.:
kubectl describe pod snakejob-c4d9bf9e-9076-576b-a1f9-736ec82afc64
kubectl logs snakejob-c4d9bf9e-9076-576b-a1f9-736ec82afc64
With these you can also follow the scale-up of the cluster:
Events:
Type     Reason             Age                From                Message
----     ------             ----               ----                -------
Warning  FailedScheduling   60s (x3 over 62s)  default-scheduler   0/1 nodes are available: 1 Insufficient cpu.
Normal   TriggeredScaleUp   50s                cluster-autoscaler  pod triggered scale-up: [{aks-nodepool1-17839284-vmss 1->3 (max: 3)}]
After a while you will see three nodes (each running one BWA job), which was defined as the maximum above while creating your Kubernetes cluster:
$ kubectl get nodes
NAME                                STATUS   ROLES   AGE   VERSION
aks-nodepool1-17839284-vmss000000   Ready    agent   74m   v1.15.11
aks-nodepool1-17839284-vmss000001   Ready    agent   11s   v1.15.11
aks-nodepool1-17839284-vmss000002   Ready    agent   62s   v1.15.11
To get detailed information including historical data about used resources, check Insights in the Azure portal under your AKS cluster Monitoring/Insights. The alternative is an instant snapshot on the command line:
$ kubectl top node
NAME                                CPU(cores)   CPU%   MEMORY(bytes)   MEMORY%
aks-nodepool1-17839284-vmss000000   217m         5%     1796Mi          16%
aks-nodepool1-17839284-vmss000001   1973m        51%    529Mi           4%
aks-nodepool1-17839284-vmss000002   698m         18%    1485Mi          13%
The workflow ran in my case for approximately 20 minutes. Some time is spend on pulling the docker image, some on installing the required software on the fly with Conda. After completion all results including logs can be found in the blob container. You will also find results listed in the first Snakefile target downloaded to the working directoy.
$ find snakemake-tutorial/
snakemake-tutorial/
snakemake-tutorial/calls
snakemake-tutorial/calls/all.vcf


$ az storage blob list  --container-name snakemake-tutorial --account-name snakemaksstg --account-key $stgkey -o table
Name                     Blob Type    Blob Tier    Length    Content Type                       Last Modified              Snapshot
-----------------------  -----------  -----------  --------  ---------------------------------  -------------------------  ----------
calls/all.vcf            BlockBlob    Hot          90986     application/octet-stream           2020-06-08T05:11:31+00:00
data/genome.fa           BlockBlob    Hot          234112    application/octet-stream           2020-06-08T03:26:54+00:00
# etc.
logs/mapped_reads/A.log  BlockBlob    Hot          346       application/octet-stream           2020-06-08T04:59:50+00:00
mapped_reads/A.bam       BlockBlob    Hot          2258058   application/octet-stream           2020-06-08T04:59:50+00:00
sorted_reads/A.bam       BlockBlob    Hot          2244660   application/octet-stream           2020-06-08T05:03:41+00:00
sorted_reads/A.bam.bai   BlockBlob    Hot          344       application/octet-stream           2020-06-08T05:06:25+00:00
# same for samples B and C
Now that the execution is complete, the AKS cluster will scale down automatically. If you are not planning to run anything else, it makes sense to shut down it down entirely:
az aks delete --name akscluster --resource-group snakemaks
Final thoughts
For fun, I ran the above with an AKS cluster using virtual nodes (Azure Container Instances; think AWS Fargate, but less complicated), which reduced the run time by a few minutes. I have little experience with ACI, so won’t comment on the details, but this is certainly something to look into as ACI is recommended for bursty workloads, like the ones that Bioinformatics is infamous for.
Azure Batch is in theory a better system to run such workloads. I’m working on native Azure Batch integration into Snakemake. If you are interested in testing or contributing, please let me know.
Dockerfile
The Docker image running in the remote compute needs to be able to talk to Azure Blob storage. So I added
pip install azure-storage-blob && \
to the Snakemake Dockerfile, just before
pip install .
followed by
docker build --tag snakemaks:5.17 .
and later uploaded to Dockerhub with
# Get image id with `docker images`
docker tag 47a4072f98b0 andreaswilm/snakemaks:5.17
docker push andreaswilm/snakemaks:5.17
Acknowledgements
Huge thanks to Haizi Zheng and especially Johannes Köster for their help and patience!