I recently had the immense pleasure to work on a project with Astrophysicists at ICRAR in Perth. These folks need some serious compute power to massage the ocean of data that their telescopes produce. Normally this type of analysis is a first-class application for supercomputing centers, however, supercomputing centers are often oversubscribed, can’t easily be upgraded and you need to download data that’s produced by radio astronomy centers all over the world. So the cloud, with access to always up-to-date hardware and international presence, is a perfect alternative for them. On Azure we’re fortunate enough to have true HPC infrastructure, e.g. RDMA over InfiniBand and a variety of HPC specific instance types, including the latest HB and HC instances, which were recently used to spin up a petascale cluster.
In this blog post, I summarize the steps needed to create a Slurm/MPI compute cluster with Lustre as storage backend on Azure. The easiest way to do this is by using Azure CycleCloud. Azure CycleCloud allows you to “create, manage, operate, and optimize HPC and big compute clusters of any scale”. One important feature is autoscaling, which adds more nodes to the cluster as the job queue grows, but also removes nodes once the job queue is empty. So you get instant scale, but also only pay for what you really need. For a more general introduction to CycleCloud, refer to the documentation. CycleCloud is generally available since August 2018 and supports several schedulers, storage clusters systems and applications out of the box. Unfortunately a Lustre template is not part of that yet and Lustre is also not yet available as service on Azure. Having said this, BeeGFS (a very good alternative) is supported out of the box by CycleCloud. For an excellent summary and benchmark of parallel virtual filesystems refer to this document by the Azure CAT team.
In this blog-post, I’ll cover the following:
- Setting up CycleCloud
- Launching a Lustre storage cluster
- Launching an MPI/Slurm cluster, that mounts the above Lustre cluster
- Gotchas
- Throughput Benchmark
Please take note of the comments section added after publishing.
CycleCloud Setup
The CycleCloud setup can be broken down into three steps
- Creation of an Azure Service Principal
- Generation of an ssh key pair to connect to your clusters.
- Installing and setting up CycleCloud
All three steps are discussed in the following.
Create a Service Principal
Think of a Service Principal (SP) as an identity with certain permissions, which is used by apps and services (here CycleCloud) to access Azure resources. The CycleCloud Quickstart describes how to create a Service Principal. For this you either need to install the Azure CLI or use the Azure Cloud Shell.
az ad sp create-for-rbac --name <your-app-name> --years 1 --output json
Make sure to record appId, password, and tenant. Using the Cloud Shell I got a cryptic permission error, which was triggered because the SP name was already in use. Running az locally properly displayed that error and I chose a different name. Once created, the SP will show up in the Azure Portal under Azure Active Directory App registrations.
Should you ever lose the credentials, you can reset them with:
az ad sp credential reset --name <your-app-name>
Create an SSH-Key Pair
For logging into the CycleCloud VM and cluster you will need an ssh-key pair. If you want to create a new one, just follow the instructions in the corresponding CycleCloud Quickstart section.
Install CycleCloud
You can install CycleCloud manually or by using an ARM template (as used in the Quickstart). The third and easiest option is to use the image from the Azure Marketplace.
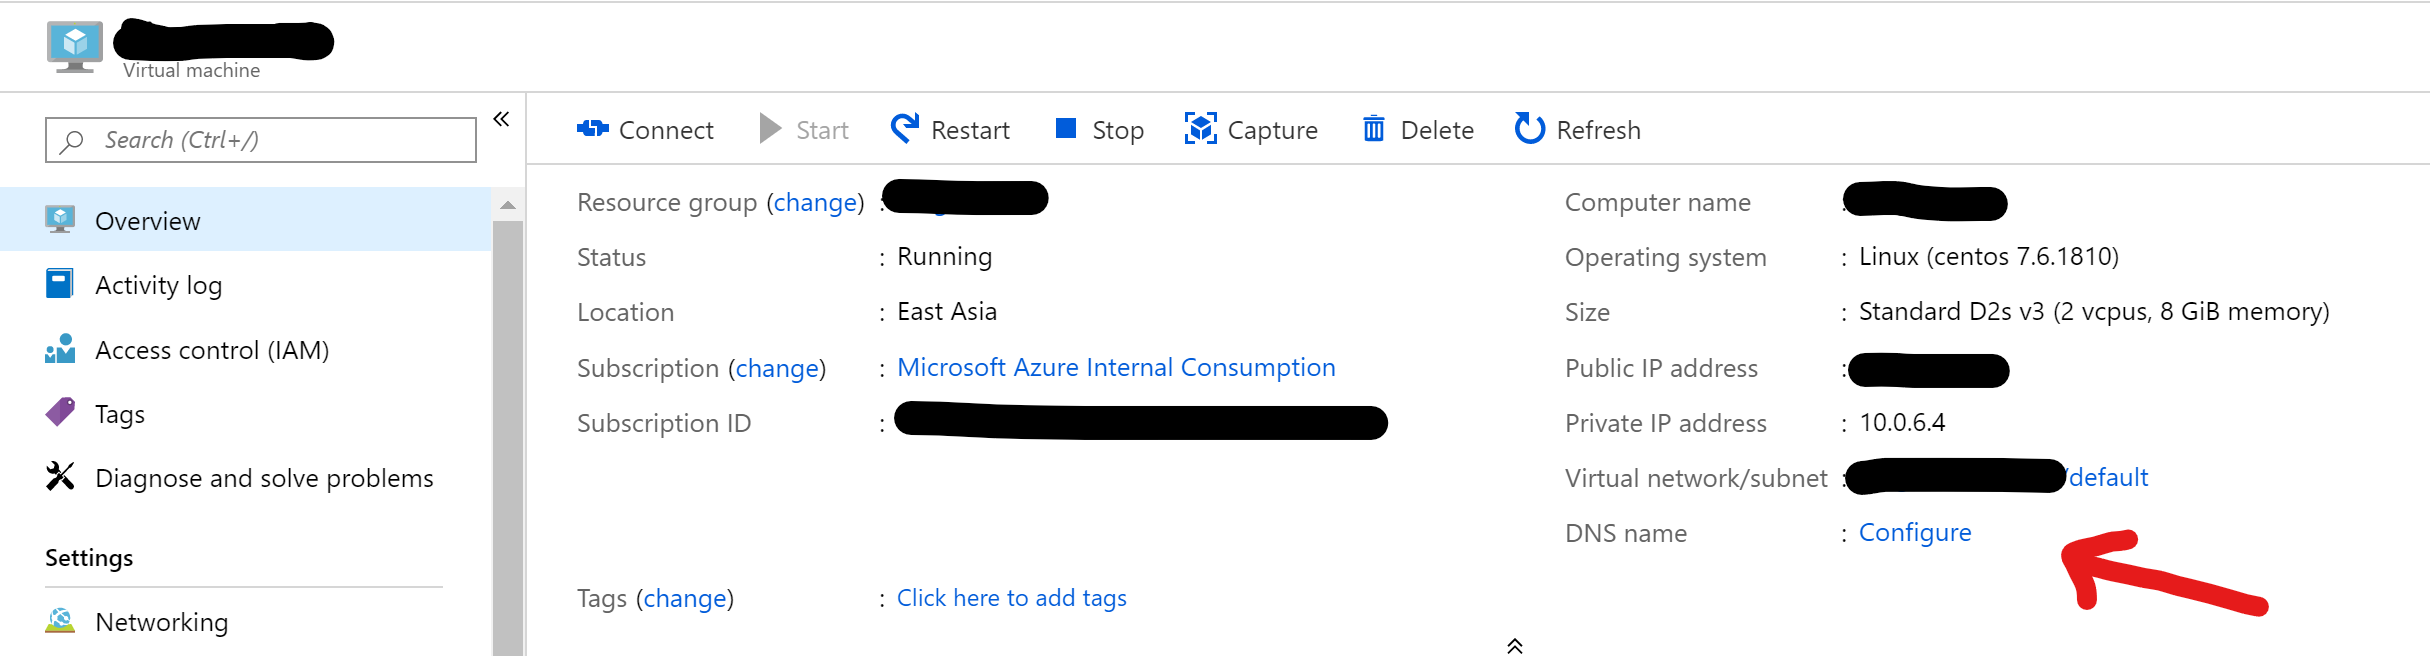
For the Marketplace installation, go to the Azure Portal, click on “Create Resource” and search for “Azure CycleCloud”. Click on the only search result and then “Create”. This will lead you to the normal process of creating a VM. Make sure to pick a region that supports the L_v2 nodes, which are required for the Lustre configuration used here. If the default instance type (D4s_v3) for the CycleCloud server appears a bit oversized, you can go with a smaller one (D2s_v3) instead. Enter machine name and details for your admin account and launch the VM. Once deployed, it’s a good idea to go to the resource and configure a DNS name to make your life easier. Otherwise you will need to remember the public IP (which will change after every restart) to log in.
Browse to https://FQDN or https://IP to continue with the initial setup using your browser. Ignore the security warning for now and follow the steps in this Quickstart section.
Once done, you will hit another setup wizard:
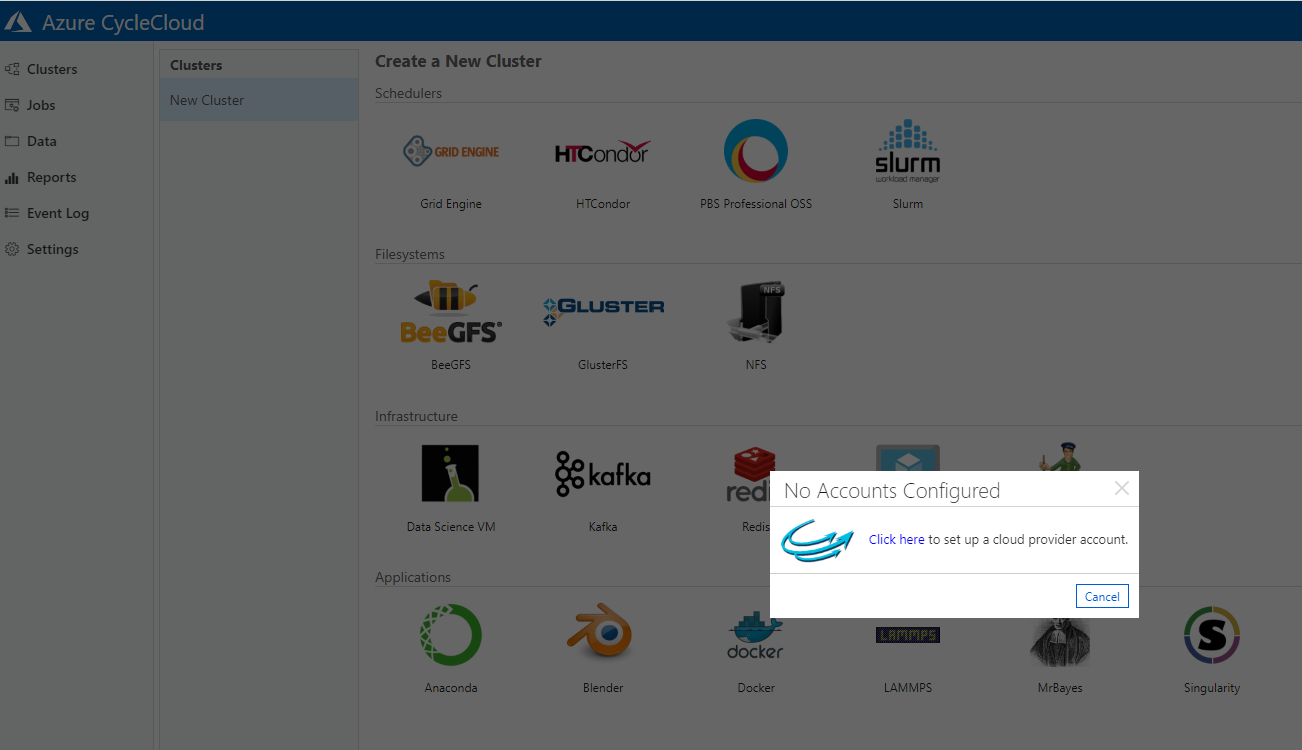
This wizard is not mentioned in the CycleCloud Quickstart, but in the Configuration section of the documentation. Here you will put in the Service Principal info (see above) and configure Azure Resources. For “Account Name” use the SP name and for “Application Secret” use the SP password. The storage account created in the latter is for the so called Project Locker etc.
Now you have a running CycleCloud server from where you can spin up your clusters. Have a look at the Quickstart on “Create a Simple Cluster”, “Submit and Auto Scale” and “Clean Up Resources” to get started.
One last thing: you will likely get a warning regarding the SSL certificate for website. To deal with this go to “Settings”, double click on SSL and acquire an SSL certificate automatically using Let’s Encrypt (hat tip to Felipe).
Lustre Storage Cluster
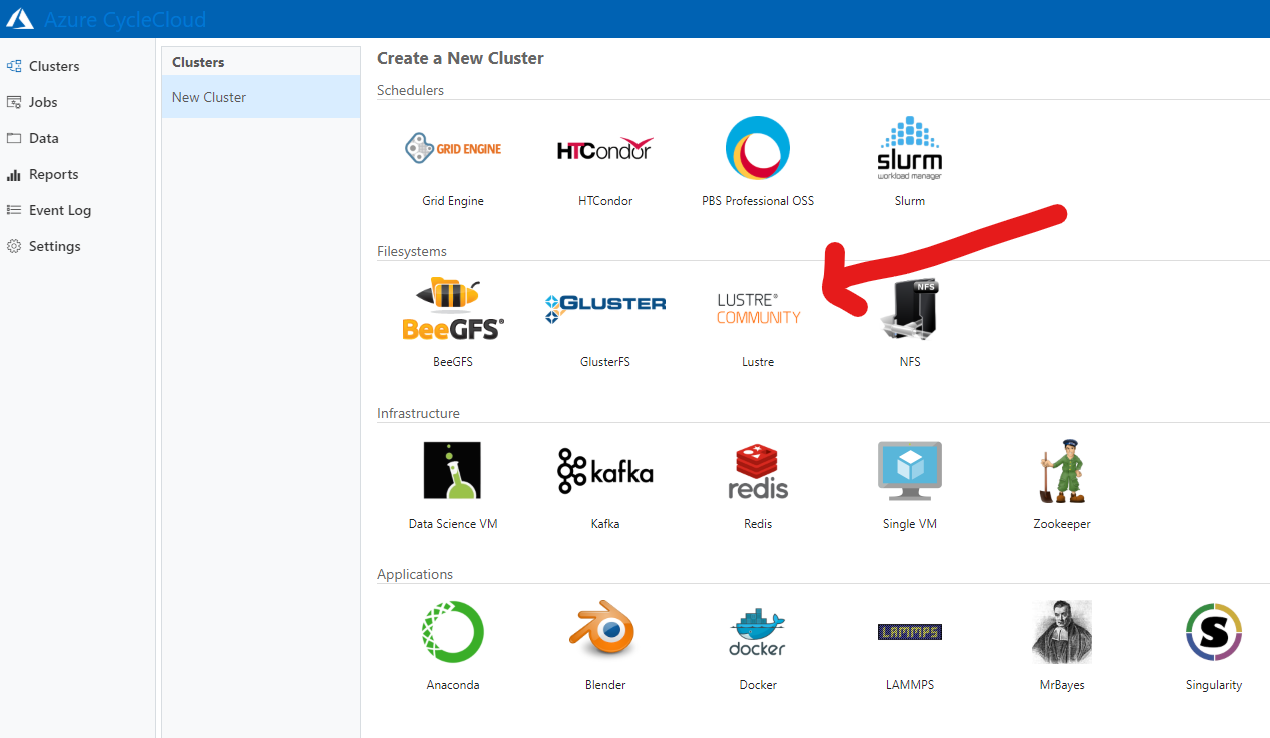
CycleCloud supports a number of storage clusters out of the box (including BeeGFS), but for this project I needed to create a Lustre cluster. Luckily Hugo Meiland has already created a corresponding CycleCloud project and shared it on Github. This makes use of the local NVMe drives of the L_v2 nodes (not yet available in all regions), i.e. no premium disks need to be attached to the Lustre Object Storage Nodes, as for example done in the Parallel Virtual File Systems Benchmark on Azure.
To make this cluster project available in your CycleCloud instance, you will have to upload the project and then import its template. But first make sure to initialize the CycleCloud instance (only needs to be done once).
To do that ssh into your CycleCloud server and run:
cyclecloud initialize
Make sure to change the default URL from http://localhost:8080 to https://localhost, otherwise you will get cryptic error messages including java.lang.NullPointerException and HTTP error 500. This populates the .cycle directory and if that’s missing, the following upload step will fail with
**** Error: Configuration file not found.  (Expected path: /home/anwilm/.cycle/config.ini)
Please check the file or try (re-)initializing.
Once initialized, import the project and template as follows:
sudo yum install git
git clone https://github.com/hmeiland/cyclecloud-lustre.git
cd cyclecloud-lustre
cyclecloud locker list
cyclecloud project upload <locker-from-previous-step>
cyclecloud import_template -f templates/lustre.txt
The last step imports the template into the web GUI and allows you to start a Lustre cluster from there. Now browse again to your CycleCloud website and log in. Go to “Cluster”, click on the plus-sign at the bottom and you should see “Lustre” as a newly added option.
If you click the logo a wizard will walk you through a couple of options. Note that “Client VM Type” is actually used for compute clients and the SMB server (and we won’t need either here, as we’ll attach our own Slurm cluster later). The “MDS VM Type” is used for the MDS and OSS servers. This has to be an instance type with NVMe disks, otherwise the scripts included in the project won’t work. You can leave the HSM options in later screens blank as we won’t be using it here. Click “Save” at the bottom right and then “Start” in the following screen. By default this will launch one MDS and OSS server, which will take some time.
Increasing Storage Size
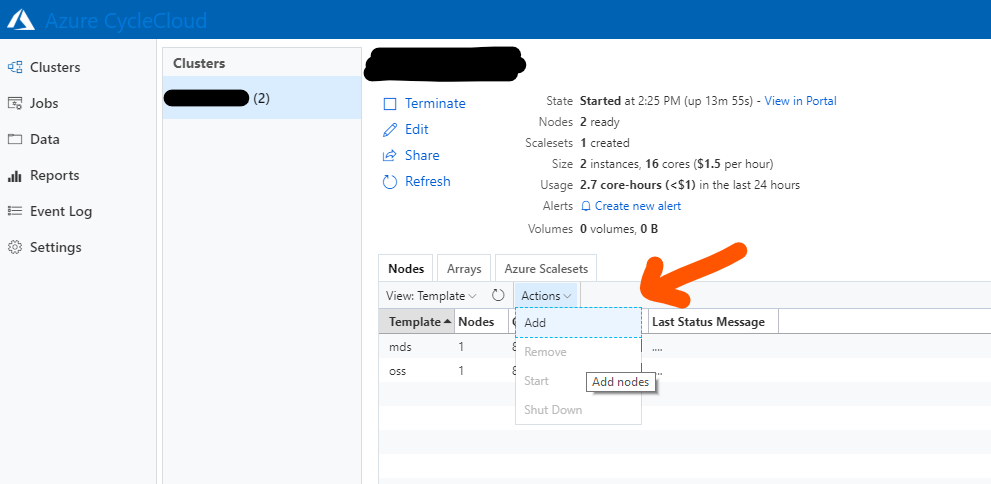
If you need more storage or want to enhance throughput, just add more OSS nodes. As for most other actions, you can do this through the GUI or the cyclecloud command (here just adding one nodes):
cyclecloud add_node <cluster-name> -c 1 -t oss
The cluster name can be inferred from the GUI or by running
cyclecloud show_cluster
The option to add nodes in the GUI is a bit hidden:
Note: Simply terminating an OSS node to reduce the storage capacity is not a good idea.
Slurm Compute Cluster
Slurm clusters are supported out of the box by CycleCloud, but here we need a cluster that automatically connects to the Lustre setup above. Using a generator script from another of Hugo Meiland’s projects (cyclecloud-demotemplates), I created a suitable CycleCloud template and project and modified it slightly to ensure proper placement settings for MPI jobs.
To add this to your CycleCloud server, ssh into the instance and then
git clone https://github.com/andreas-wilm/cyclecloud-dingo-compute
cd cyclecloud-dingo-compute
cyclecloud locker list
cyclecloud project upload <locker-from-previous-step>
cyclecloud import_template -f templates/dingo-compute.txt
Log into the CycleCloud web interface and go to “Clusters”. Click on the plus sign at the bottom and you will see a new cluster option appear: “dingo-compute” (DINGO was the codename of this project: Deep Investigation of Neutral Gas Origins). Click on it to start the cluster creation wizard.
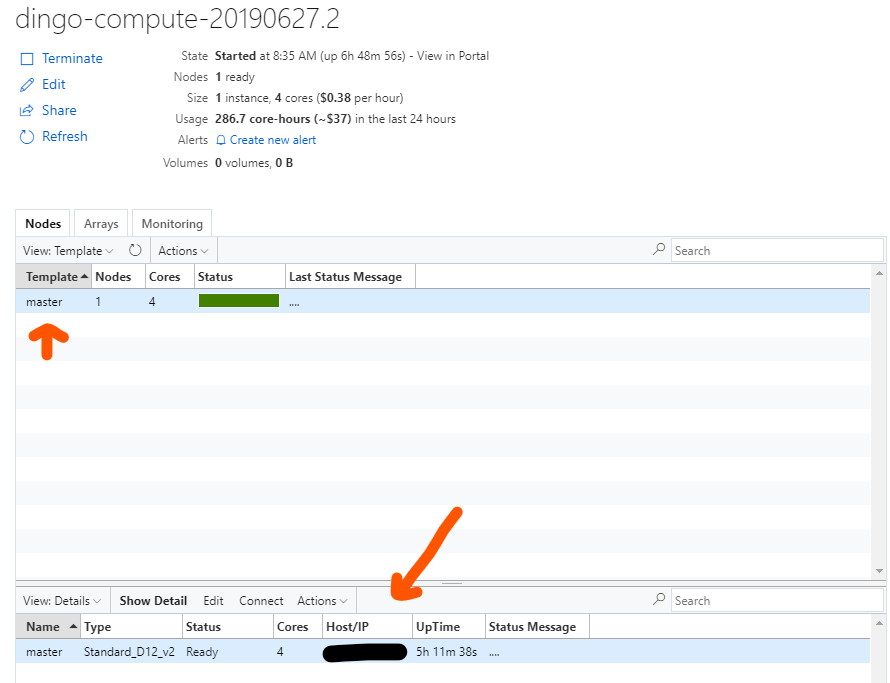
Make sure the cluster uses the same subnet as your Lustre cluster, choose the compute VM type that suits your need under “Node Settings” and set the Autoscaling option as needed. Click “Save”, then “Start” and wait for the master node to come up. By default only the master node will be started. If you click on it in the Nodes/Template section its IP address will be displayed in the “Details” section (double click there to get even more info).
Ssh into the master node and you should see that your Lustre filesystem is mounted:
$ mount | grep lustre
10.0.3.5@tcp:/lustre on /lustre type lustre (rw,seclabel,lazystatfs)
Adding and removing nodes
For non-auto scaling clusters you will need to add and remove nodes manually as required. This can be done through the web GUI or the commandline (see above for both). To remove nodes, you can also use GUI or the CLI (remove_node). If you want to terminate all compute nodes, you can use a filter expression (hat tip to Jer-Ming):
cyclecloud terminate_node <clustername> --filter 'template=="execute"'
Common Problems
Removing vs. terminating nodes
In most cases you will want to use terminate_node, which shuts down a node and removes it from the cluster. remove_node on the other hand terminates the VM and also deletes the record from the CycleCloud datastore. So don’t run remove_node unless the VM was accidentally deleted in Azure, and CycleCloud can’t track it anymore. A nice way to irrevocably ruin your cluster is to run terminate_node on the master: you will not be able to restart the cluster after that!
Compute nodes won’t start
This happened to me because the compute nodes were not available in my region (F2s_v2 in Southeast Asia). The only way around this is to make sure to select a VM type supported in the region and keep an eye on client nodes during the cluster initialization.
“Node software installation failure”
Sometimes node initialization can fail during the software installation phase. For master nodes (during cluster bootup), there is no other way to deal with the problem then to terminate and restart the cluster. For client nodes, it’s easiest to terminate the affected node and add a new one. If you need to debug problems, ssh into the VM, and look at /opt/cycle/jetpack/logs/chef-client.log. And If your SSH key doesn’t work because the user has not been created yet, you can actually login go through the CycleCloud application server itself (hat tip to Jer-Ming):
ssh -i /opt/cycle_server/.ssh/cyclecloud.pem -l cyclecloud <node-ip-address>
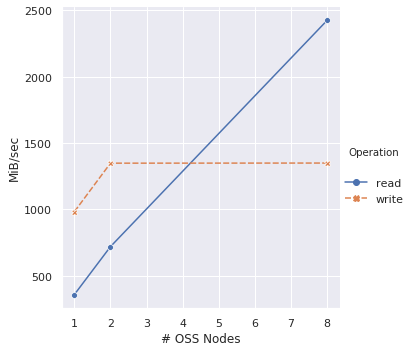
Lustre Throughput Benchmark
To benchmark the Lustre throughput I ran IOR as described in the Parallel File Systems benchmark by the Azure CAT team. I used the numbers in Table 4 as baseline to compare against results I got with 1, 2 and 8 OSS nodes, keeping all other parameters the same: 32 MB transfer size, 4 GB block size, 16 processes, 5 clients (here: Standard_F16). The exact command was:
mpiexec --hostfile hosts -np 16 /shared/bin/ior -a MPIIO -v -B -F -r -w -t 32m -b 4G -o /lustre/test.`/usr/bin/date +%Y-%m-%d_%H-%M-%S`
It’s important to note that the disk setups differ: the CAT benchmark used 10 P30 managed disks converted to RAID 0 per OSS node and, whereas the setup described here uses the one local NVMe disk of the L instances used as OSS nodes.
The read throughput scales as expected with each added OSS nodes, however it’s only half of what the CAT team got. This is likely due to differences in the disk setup. However, the write throughput stagnates after adding two OSS nodes. This will require some more investigation.
To be continued…
Notes added after publishing
Cycle version
The Cycle version used here was 7.7
Lustre locking
The default behaviour of Lustre cluster is to not allow locking. This can be changed by remounting with flock as option. The following snippet enables locking:
umount /lustre
sed -i -e '/lustre/s/defaults/defaults,flock/' /etc/fstab;
mount /lustre;
This can for example be added to the startup scripts of the dingo-compute template, e.g. specs/default/cluster-init/scripts/00_setup_lustre_perms.sh
Hardcoded user names in templates
The scripts in the dingo-compute template all assume that your cycle user was called cycleadmin.
ssh-key vs passwords
You need (in almost all cases) an ssh-key to log into the CycleCloud VM and cluster, even though you are given the option to use a password during the setup process. Always use an ssh-key!